Overview of R.O.A.D.
R.O.A.D. stands for:
- Raw Intelligence Gathering
- Organization & Analysis
- Actionable Detection
- Deployment & Refinement

When combined with the six steps outlined below, this approach ensures your organization can systematically transform raw CTI into real-world detection rules. While each step is broken down into an extensive checklist, think of R.O.A.D. as the conceptual glue that keeps your CTI lifecycle aligned, effective, and continually improving.
Step 1: Collection and Normalization
Objective
Assemble threat data from all relevant sources, then standardize it so that your organization can use it effectively. This ensures incoming information is high-quality, unique, and ready for downstream analysis.
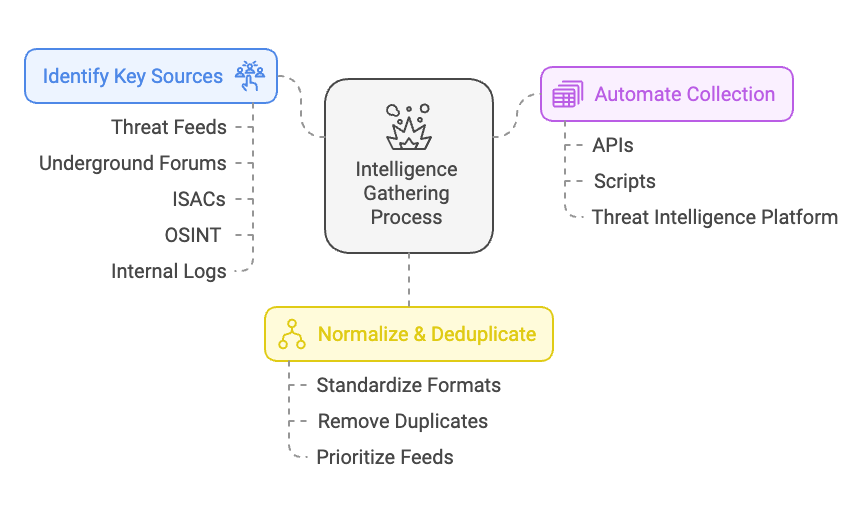
Identify and Catalog Sources
- External Threat Feeds
- Commercial CTI providers (e.g., Recorded Future, CrowdStrike)
- Open-source feeds (e.g., abuse.ch, MalwareBazaar)
- Dark web and underground forums
- Industry Sharing Groups (ISACs)
- Internal Logs and Telemetry
- SIEM event logs (firewall, proxy, IDS/IPS)
- Endpoint Detection & Response (EDR) logs
- Incident response artifacts (forensic images, memory dumps)
- Vulnerability scan results
- External Threat Feeds
Set Up Collection Mechanisms
- Automation and Scheduling
- Use APIs or scripts to pull data periodically
- Schedule feed ingestion at intervals aligned with operational needs (e.g., hourly, daily)
- Threat Intelligence Platform (TIP) Integration
- Centralize data ingestion (via STIX/TAXII or vendor-specific formats)
- Map each source to a consistent data model
- Automation and Scheduling
Normalization and Deduplication
- Common Data Format
- Convert IOC data to STIX, JSON, or your chosen schema
- Standardize fields (e.g., IP, domain, file hash, severity level)
- Remove Duplicates
- Check for overlapping indicators across multiple feeds
- Retain metadata about when, where, and how often each IOC appeared
- Common Data Format
Data Quality Checks
- Confidence and Reliability Ratings
- Assign confidence scores to IOCs based on the source’s track record
- Mark data with TLP tags (e.g., TLP:RED, TLP:AMBER) to define sharing constraints
- Relevance to Your Environment
- Quickly filter out IOCs that are clearly not related (e.g., foreign IPs never seen in your network or stale, years-old indicators)
- Confidence and Reliability Ratings
Documentation and Reporting
- Maintain a Source Inventory
- Record feed provider details, cost, and typical data quality
- Version Control or Change Logs
- Keep track of updates to your collection process or data schema
- Maintain a Source Inventory
Step 2: Contextualization and Enrichment
Objective
Enrich each threat indicator with meaningful context, such as business impact, attacker tactics, and any internal visibility you have. Contextualization transforms raw data into actionable intelligence.
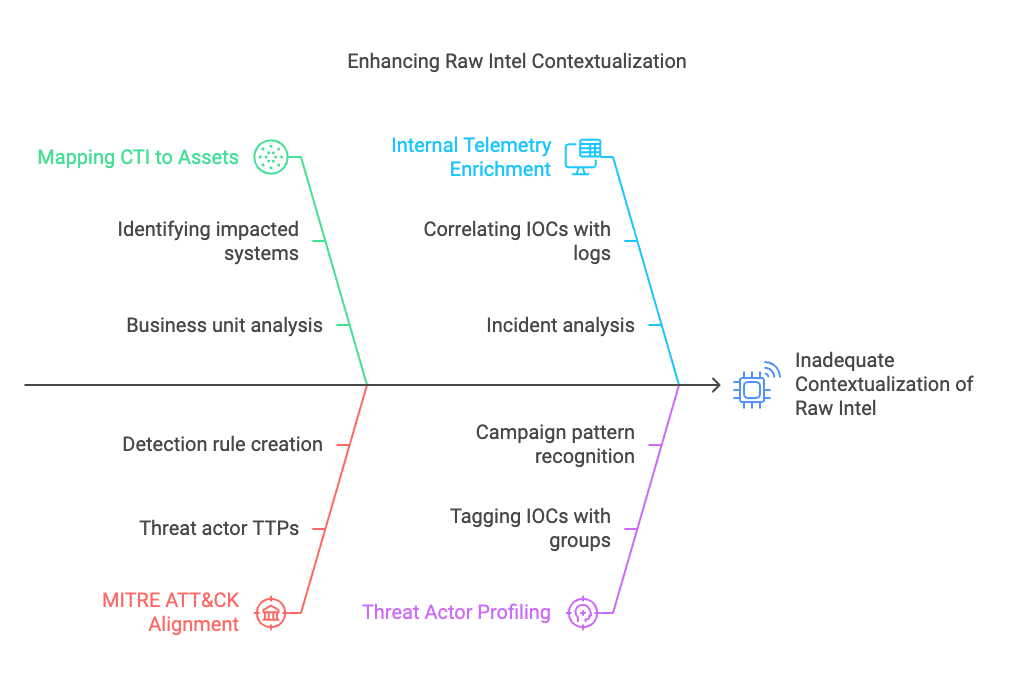
Correlate with Internal Data
- Asset-Relevance Mapping
- Map each IOC to specific systems, applications, or business processes
- Identify which critical assets might be targeted by these threats
- Historical Occurrences
- Check if the IOC has appeared in internal logs in the past (e.g., SIEM or EDR data)
- Investigate prior incident reports related to the same indicators
- Asset-Relevance Mapping
Threat Actor and Campaign Profiling
- Threat Actor Identification
- Use naming conventions (e.g., FIN7, APT28) if available
- Correlate IOCs with known TTPs from frameworks like MITRE ATT&CK
- Known Campaign Associations
- Determine if the indicators tie to large-scale campaigns (e.g., ransomware, state-sponsored espionage)
- Threat Actor Identification
Add Technical Context
- IP Reputation, Domain Age, WHOIS
- Query reputational databases (e.g., VirusTotal, IPInfo)
- Gather WHOIS details for domain registrations
- File Analysis
- Submit suspicious file hashes to sandbox environments
- Check for known malware signatures or capabilities
- IP Reputation, Domain Age, WHOIS
Business and Operational Context
- Potential Impact Assessment
- Evaluate what a successful attack could mean for service availability or data confidentiality
- Legal and Compliance Considerations
- Flag any threats that could cause regulatory or privacy violations
- Potential Impact Assessment
Confidence and Severity Scoring
- Scoring Model
- Develop or adopt a structured scoring system (e.g., High, Medium, Low)
- Factor in both technical severity (e.g., destructive malware) and business impact (e.g., customer data exposure)
- Review and Approval Process
- Engage stakeholders (SOC, threat hunters, risk management) before finalizing the threat assessment
- Scoring Model
Step 3: Threat Prioritization and Use Case Development
Objective
Narrow your focus to the threats that matter most, and create tangible use cases that guide your detection strategy.
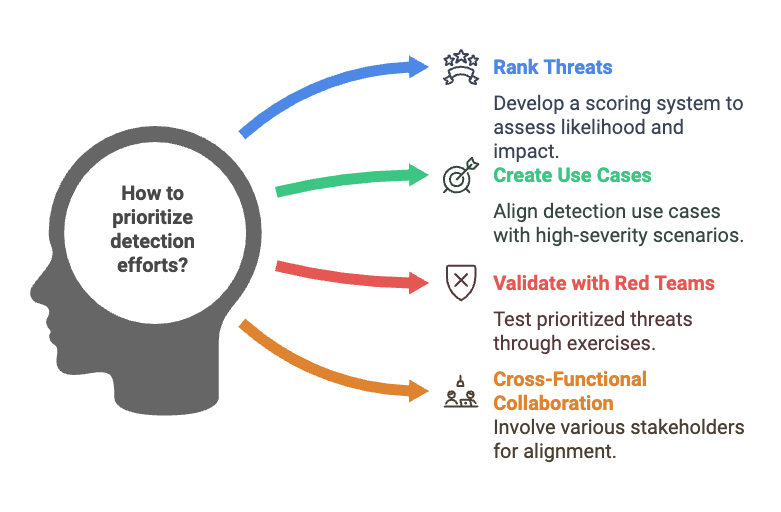
Rank Threats by Severity and Likelihood
- Severity Matrix
- Plot threats on a matrix based on potential damage vs. frequency of occurrence
- Immediate vs. Long-Term Threats
- Separate urgent threats (e.g., zero-day exploits) from longer-term concerns
- Severity Matrix
Map Threats to Existing Controls
- Gaps Assessment
- Identify if certain threats are already partially covered by existing controls
- Note any coverage gaps for immediate remediation
- Update Security Policies
- Align detection capabilities with any newly identified threats that bypass standard controls
- Gaps Assessment
Use Case Creation
- Scenario Definition
- Clearly define what a successful detection looks like for each threat (e.g., suspicious PowerShell usage, malicious domain connection)
- Align with MITRE ATT&CK
- Reference Tactics, Techniques, and Procedures (TTPs) relevant to each scenario
- Test Cases and Red Team Exercises
- Validate each scenario with simulated attacks
- Document expected log entries, triggers, and alerts
- Scenario Definition
Business Impact Alignment
- Critical Assets and Processes
- Attach each use case to the potential impact on specific assets or processes
- Communicate Across Teams
- Present top priority scenarios to executive or business stakeholders
- Critical Assets and Processes
Prioritization Feedback Loop
- SOC and IR Feedback
- Ensure the SOC team agrees with the threat ranking
- Gather input from incident responders on recent real-world cases
- Revisit Quarterly
- Threat landscapes shift. Re-evaluate top threats regularly and adjust use cases accordingly
- SOC and IR Feedback
Step 4: Creation of Detection Rules
Objective
Translate prioritized threats and use cases into precise detection rules that can be deployed in your existing security technologies.
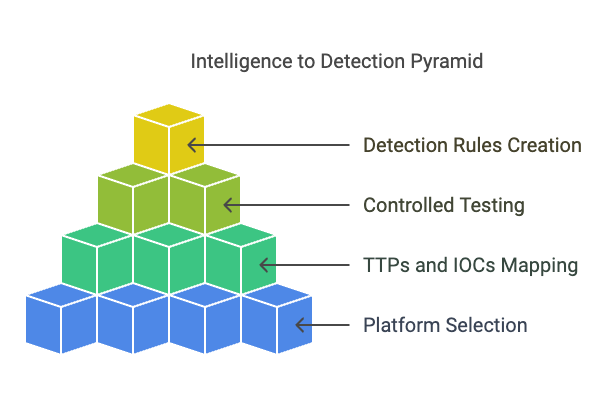
Select Detection Technologies
- Platforms
- SIEM (e.g., Splunk, Azure Sentinel), EDR/XDR (e.g., CrowdStrike, Microsoft Defender), or IDS/IPS (Suricata)
- Rule Formats
- Sigma rules for cross-platform SIEM
- Snort or Suricata signatures for network detection
- EDR-specific queries or playbooks
- Platforms
Design Rule Logic
- IOC-Based
- Check for known malicious IPs, domains, hashes, or email addresses
- Behavioral/TTP-Based
- Monitor suspicious process creation, file modifications, or registry changes
- Align detection logic with MITRE ATT&CK techniques
- Contextual Filtering
- Incorporate user or asset context (e.g., critical server, high-privilege account) to reduce false positives
- IOC-Based
Establish Thresholds and Triggers
- Alert Sensitivity
- Balance the need for visibility against potential alert fatigue
- Event Frequency and Correlation
- Set thresholds that require a certain number of suspicious events before triggering an alert
- Use correlation rules to combine multiple event types (e.g., suspicious domain + unusual process start)
- Alert Sensitivity
Testing and Validation
- Lab or Sandbox Environments
- Simulate known malicious behaviors to confirm rule triggers
- False Positive Testing
- Attempt normal user activities that might trigger the rule
- Adjust thresholds or add whitelists as needed
- Lab or Sandbox Environments
Documentation
- Rule Library
- Maintain a shared repository with rule descriptions, logic, and version history
- Naming Conventions
- Use systematic naming to easily track rule coverage (e.g.,
[ActorName]_[MITRE_TechID]_[Severity])
- Use systematic naming to easily track rule coverage (e.g.,
- Rule Library
Step 5: Deployment and Tuning
Objective
Implement your detection rules in production environments, then refine them to achieve a reliable balance between actionable alerts and minimal false positives.
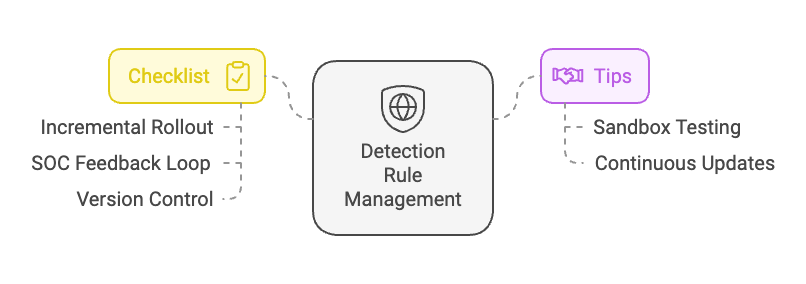
Staged Rollout
- Pilot Deployment
- Deploy new rules to a select group of systems or a lab environment
- Phased Expansion
- Gradually expand coverage to more hosts, network segments, or user groups once initial stability is confirmed
- Pilot Deployment
SOC Feedback Mechanisms
- Daily/Weekly Tuning Sessions
- Review new alerts, identify false positives, and adjust rules or thresholds
- Defined Escalation Paths
- Ensure all alerts have a documented owner and escalation procedure
- Communication Channels
- Provide a quick way for analysts to report consistent false positives or missed detections
- Daily/Weekly Tuning Sessions
Rule Performance Monitoring
- Alert Volume Tracking
- Keep an eye on the total number of alerts generated by each rule
- Investigation Outcomes
- Track how many alerts lead to confirmed threats versus benign events
- Use of Dashboards
- Build SIEM or TIP dashboards to visualize rule performance and facilitate faster tuning
- Alert Volume Tracking
Continuous IOC Updates
- Automate IOC Feeds
- Sync your detection environment with your TIP so that new IOCs are automatically integrated
- Retire Stale IOCs
- Set an expiration policy for older indicators that no longer appear active
- Automate IOC Feeds
Maintain Version Control
- Git Repositories or Similar
- Tag each rule with a version number or commit ID
- Rollback Process
- In case a new rule causes widespread issues, revert to a previous stable state quickly
- Git Repositories or Similar
Step 6: Measurement and Continuous Improvement
Objective
Evaluate the effectiveness of your detection program, capture lessons learned, and iterate to stay ahead of changing threats.
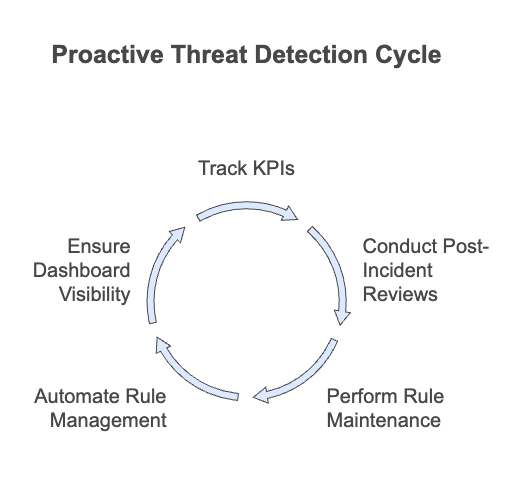
Key Performance Indicators (KPIs)
- Detection Rate
- Percentage of real threats caught by existing rules
- False Positive Ratio
- Compare confirmed benign alerts to valid detections
- Mean Time to Detect (MTTD)
- Average elapsed time before an alert triggers on suspicious activity
- Mean Time to Respond (MTTR)
- Average time from alert generation to threat containment
- Detection Rate
Post-Incident Reviews
- Root Cause Analysis
- Examine how an incident started, propagated, and was detected (or missed)
- Gaps Identification
- Document any detection gaps and create new or updated rules as needed
- Lessons Learned
- Share findings with stakeholders to refine training, policies, and technical controls
- Root Cause Analysis
Quarterly or Monthly Audits
- IOC and Rule Validity
- Remove outdated or irrelevant IOCs (e.g., ephemeral IP addresses)
- Retire or tweak any detection rules that are no longer useful
- Threat Landscape Review
- Check if your priority threats have changed (e.g., new ransomware strains)
- IOC and Rule Validity
Continuous Integration (CI/CD) for Detection
- Automated Testing Pipeline
- Leverage test frameworks that run detection rules against known malicious samples
- Automated Deployment
- Schedule or automate rule updates to ensure immediate response to new intelligence
- Automated Testing Pipeline
Reporting and Metrics Communication
- Dashboards and Charts
- Visualize detection coverage, severity levels, and alert trends
- Executive Summaries
- Distill technical metrics into high-level insights for leadership
- Ongoing Feedback Loop
- Regularly distribute reports to relevant teams and gather input for further improvements
- Dashboards and Charts
Practical Example 1: Phishing and Business Email Compromise (BEC)
Scenario Overview A threat actor is conducting large-scale phishing campaigns targeting finance teams in mid-sized organizations. The actor’s goal is to trick staff into making fraudulent wire transfers or divulging corporate payment details. The organization has received external CTI indicating a surge in phishing attempts that spoof its executives’ email addresses.
Below is how each of the 6 Steps in the new checklist could be applied.
Step 1: Collection and Normalization
- Identify and Catalog Sources
- Collect indicators from commercial threat feeds and phishing repositories (e.g., PhishTank).
- Gather internally from suspicious email logs and blocked spam reports.
- Set Up Collection Mechanisms
- Schedule daily ingestion of external phishing intelligence through API connections.
- Configure an internal mailbox to receive forwarded suspicious emails from end users.
- Normalization and Deduplication
- Convert indicators (malicious domains, sender addresses, email subjects) to a standard JSON format.
- Merge duplicates by tracking domains repeatedly seen in multiple feeds.
- Data Quality Checks
- Tag TLP:AMBER for intel referencing in-progress phishing campaigns.
- Filter out generic spam domains if they have no relevance to the finance department.
- Documentation and Reporting
- Maintain a spreadsheet (or TIP module) with validated phishing-related IOCs and their historical use.
Outcome: The organization has a curated list of suspicious sender domains, IPs, and potential phishing email subject lines.
Step 2: Contextualization and Enrichment
- Correlate with Internal Data
- Match suspicious sender addresses with corporate email logs to see if employees received or interacted with them.
- Identify potential victim departments, such as Finance, Accounts Payable, etc.
- Threat Actor and Campaign Profiling
- Check if these phishing addresses are tied to known BEC groups like “Cosmic Lynx.”
- Associate them with MITRE ATT&CK techniques (e.g., T1589: Credential Harvesting).
- Add Technical Context
- Perform WHOIS checks on suspect domains to see if they were registered recently.
- Analyze any suspicious attachments in a sandbox to detect malicious macros or trojans.
- Business and Operational Context
- Assess potential financial impact if finance staffers fall for the phish.
- Note that a successful BEC could lead to large wire transfers.
- Confidence and Severity Scoring
- Mark these phishing indicators as High Severity due to direct financial risk.
- Validate with the SOC to confirm the high confidence.
Outcome: Intelligence indicates a coordinated phishing/BEC campaign posing a significant financial threat. Key domains and email patterns are identified as high-priority IOCs.
Step 3: Threat Prioritization and Use Case Development
- Rank Threats by Severity and Likelihood
- BEC attempts are assigned a top-tier severity because of potential monetary losses.
- Use a scoring model that factors in high operational impact.
- Map Threats to Existing Controls
- Confirm if existing email gateway filters are partially blocking these senders.
- Identify any coverage gaps (e.g., no protective DMARC on certain domains).
- Use Case Creation
- Define a scenario: “Alert when an external email address resembling an internal executive’s account is received by Finance.”
- Include detection logic for suspicious subject lines like “Urgent Payment Request.”
- Business Impact Alignment
- Link these use cases to the finance department’s processes.
- Provide CFO and finance managers with an overview of how these alerts might affect day-to-day operations.
- Prioritization Feedback Loop
- Present the plan to the SOC and finance stakeholders.
- Finalize that BEC alerts get immediate investigation priority.
Outcome: The organization’s top priority is to quickly detect and respond to any email impersonating high-level executives targeting the finance team.
Step 4: Creation of Detection Rules
- Select Detection Technologies
- Configure custom rules in the email security gateway and SIEM (e.g., Splunk or Microsoft Sentinel).
- Design Rule Logic
- IOC-Based: Alert if the email is from flagged suspicious domains or known BEC addresses.
- Behavioral/TTP-Based: Look for patterns like “reply-to” mismatch, or keywords such as “wire transfer,” “urgent,” or “payment” in the subject.
- Contextual Filtering: Restrict rules to emails directed to finance employees only.
- Establish Thresholds and Triggers
- Trigger an immediate high-severity alert if the domain is on the known “malicious BEC” list.
- Generate a medium alert if the email has suspicious keywords but is not on the malicious domain list.
- Testing and Validation
- Send simulated BEC emails to a test finance mailbox in a sandbox environment.
- Check for false positives with legitimate executive requests.
- Documentation
- Store rules in a Git repository under “BEC-phishing-detection.”
- Tag them as
[BEC]_[PhishingTechnique]_[HighSeverity].
Outcome: Newly deployed rules can detect suspicious email addresses, subject lines, or domain names indicative of BEC attacks.
Step 5: Deployment and Tuning
- Staged Rollout
- Start by applying rules to a subset of the finance department’s mailboxes.
- Monitor performance for a week, then expand to the entire finance team.
- SOC Feedback Mechanisms
- Host daily reviews for the first two weeks to track false positives.
- Adjust rules or add whitelists for certain known safe domains.
- Rule Performance Monitoring
- Track how many BEC-related alerts appear daily.
- Investigate each alert’s outcome (true positive vs. false positive).
- Continuous IOC Updates
- Automatically pull new phishing domains from the TIP every 24 hours.
- Retire or reduce severity on domains no longer in active campaigns.
- Maintain Version Control
- Keep each tuning adjustment in the Git repo with a date-based commit.
Outcome: The organization refines BEC alerts to focus on high-risk emails, reducing noise and capturing real threats promptly.
Step 6: Measurement and Continuous Improvement
- Key Performance Indicators (KPIs)
- Detection Rate: Percentage of actual BEC attempts flagged by the new rules.
- False Positive Ratio: How often do legitimate executive emails trigger an alert?
- Mean Time to Detect (MTTD): Time from email receipt to alert generation.
- Post-Incident Reviews
- Conduct a review whenever the finance team reports a suspicious email.
- Update detection rules if certain subject lines or domain patterns were missed.
- Quarterly or Monthly Audits
- Check if any new BEC actor groups have emerged.
- Remove or lower severity for stale domains.
- Continuous Integration for Detection
- Run automated tests against new phishing indicators to verify rule coverage.
- Deploy updated rules within hours if a new, critical BEC domain appears.
- Reporting and Metrics Communication
- Present improvements to the CFO and finance leadership monthly.
- Show the drop in successful phishing attempts after the new rules were deployed.
Outcome: The organization steadily improves its detection rules, responds faster to new phishing campaigns, and shares progress with executive leadership.
Practical Example 2: Insider Threat Exfiltrating Sensitive Data
Scenario Overview An employee with elevated privileges is suspected of transferring sensitive files to a personal cloud storage account. Recent intelligence from insider threat case studies suggests attackers (or disgruntled employees) often use legitimate services like Dropbox or Google Drive to exfiltrate data. The organization wants to build insider threat detection capabilities using the R.O.A.D. methodology and the six steps.
Step 1: Collection and Normalization
- Identify and Catalog Sources
- Pull logs from Active Directory for user access history.
- Collect proxy logs for outbound HTTP/HTTPS traffic to file-sharing domains.
- Incorporate any existing employee behavior data, such as times of large file transfers.
- Set Up Collection Mechanisms
- API integrations or syslog forwarding to a SIEM (e.g., Splunk) for real-time log ingestion.
- Configure specialized user behavior analytics (UBA) if available.
- Normalization and Deduplication
- Convert AD events, file access records, and proxy logs into a standardized log format (e.g., JSON).
- Merge duplicates when multiple systems log the same file access event.
- Data Quality Checks
- Filter out known business processes where uploading is normal (e.g., legitimate marketing uploads).
- Keep a curated list of suspicious file-sharing domains that employees typically shouldn’t be using.
- Documentation and Reporting
- Maintain an updated dictionary of “sensitive file directories” (e.g., financials, customer data).
- Track whitelisted cloud domains used by the company for official purposes (e.g., sanctioned Office 365 sites).
Outcome: Centralized, clean data regarding user activities, access privileges, and outbound connections, ready for deeper analysis.
Step 2: Contextualization and Enrichment
- Correlate with Internal Data
- Match high-privilege user accounts with actual file access logs and external upload attempts.
- Review any HR flags (e.g., employees under performance review or with known grievances).
- Threat Actor and Campaign Profiling
- While “insider threat” is not always a traditional external actor, glean insights from known TTPs, such as data exfiltration over HTTPS.
- Reference MITRE ATT&CK technique T1022 (Data Encrypted) if employees use encrypted channels.
- Add Technical Context
- Check domain WHOIS info for suspicious file-sharing services.
- Use threat feeds that track risky cloud storage providers used in exfiltrations.
- Business and Operational Context
- Identify which departments handle the most confidential data (e.g., R&D, Finance).
- Assess potential financial or reputational impact if intellectual property is leaked.
- Confidence and Severity Scoring
- Rate suspicious file movement by the user as High Severity if they belong to a high-risk department.
- Validate significance with SOC leadership and HR/legal if the user is under watch.
Outcome: The organization pinpoints high-risk staff, flagged external domains, and important file repositories where data exfiltration would be critical.
Step 3: Threat Prioritization and Use Case Development
- Rank Threats by Severity and Likelihood
- Insider exfiltration gets a high rank if the employee has known grievances or access to sensitive material.
- Recognize that not all cloud storage domains are suspicious if the business commonly uses them.
- Map Threats to Existing Controls
- Check DLP (Data Loss Prevention) solutions to see if they already monitor certain file types.
- Identify any gaps in monitoring for personal Dropbox, Google Drive, or other common exfil channels.
- Use Case Creation
- “Alert if an employee in a high-risk role uploads more than 100MB of data to an unsanctioned cloud domain in a single session.”
- “Monitor for unusual off-hours activity from privileged user accounts.”
- Business Impact Alignment
- Tie these use cases to brand protection, intellectual property risks, and regulatory compliance.
- Communicate with HR and Legal teams about the consequences of insider data theft.
- Prioritization Feedback Loop
- Validate these scenarios with your SOC lead and HR for insider threat policies.
- Plan recurring reviews to adjust thresholds or add new suspicious domains.
Outcome: Clear detection scenarios focusing on large data transfers, unsanctioned domains, and anomalous user behavior.
Step 4: Creation of Detection Rules
- Select Detection Technologies
- SIEM-based correlation rules to tie user identity with proxy logs.
- EDR or DLP solutions to track file movements on endpoints.
- Design Rule Logic
- IOC-Based: Look for known risky cloud domains.
- Behavioral/TTP-Based: Alert on large data transfer spikes, especially from privileged user accounts.
- Contextual Filtering: Include normal baseline usage for employees (e.g., an intern uploading large files might be unusual vs. a marketing intern uploading large video assets might be normal).
- Establish Thresholds and Triggers
- Set a high-severity rule if an employee outside normal working hours uploads ≥ 50MB in one go.
- Add a medium-severity rule for repeated smaller uploads over a short time window.
- Testing and Validation
- Simulate an insider transferring dummy “sensitive” files to an unsanctioned domain in a test lab.
- Confirm that legitimate usage (e.g., the design team uploading large graphics to the official cloud platform) does not trigger.
- Documentation
- Maintain these insider threat detection rules in your Git-based rule repository.
- Tag them as
[InsiderThreat]_[DataExfil]_[HighRiskDept].
Outcome: The SIEM and DLP solutions are armed with targeted rules to detect suspicious outbound data transfers.
Step 5: Deployment and Tuning
- Staged Rollout
- Enable new insider threat rules on a limited group of high-privilege users initially.
- Observe and refine for 2-4 weeks.
- SOC Feedback Mechanisms
- Conduct weekly reviews of triggered alerts.
- Collaborate with HR if a genuine malicious insider suspicion arises.
- Rule Performance Monitoring
- Evaluate how many alerts lead to actionable investigations vs. false positives.
- Analyze any patterns in flagged employee behaviors.
- Continuous IOC Updates
- Add newly identified suspicious file-sharing domains to the watchlist.
- Remove or downgrade known benign services or business partners’ domains.
- Maintain Version Control
- Document each rule adjustment in the SIEM or DLP config repository.
- Tag modifications for auditing (e.g., “v1.2 – decreased threshold from 100MB to 50MB”).
Outcome: The insider threat detection rules become more accurate and focused, enabling swift action if a malicious insider tries to exfiltrate data.
Step 6: Measurement and Continuous Improvement
- Key Performance Indicators (KPIs)
- Detection Rate: How many insider anomalies were caught vs. missed?
- False Positive Ratio: Number of legitimate large file transfers incorrectly flagged.
- MTTD and MTTR: Time taken to detect and investigate anomalous activity.
- Post-Incident Reviews
- If an insider tries to exfiltrate data, dissect the incident to see if detection was timely.
- Strengthen rules based on actual exfiltration methods used.
- Quarterly or Monthly Audits
- Update or retire older insider threat rules if the environment changes (e.g., new sanctioned cloud storage).
- Revise user role definitions and thresholds based on organizational changes.
- Continuous Integration for Detection
- Use test data sets simulating exfil attempts to ensure rules still work.
- Automate rule deployment if a new shady file-sharing domain emerges.
- Reporting and Metrics Communication
- Present insider threat metrics to HR and executive leadership.
- Emphasize the value of early detection in preventing major data leaks.
Outcome: The organization systematically refines its insider threat detection strategy, protecting critical data and swiftly responding to suspicious activity.
Conclusion
Adopting the R.O.A.D. methodology—Raw Intelligence → Organization & Analysis → Actionable Detection → Deployment & Refinement—keeps your CTI efforts structured, purposeful, and effective. By walking through these six steps and leveraging the detailed checklists at each phase, your organization can transform raw data into detection rules that truly make a difference.
Staying agile is key: Threat actors continuously evolve their tactics, so regular reviews and updates are critical. Each step in this process creates a loop of refinement, from initial data collection to the final measurement of results. Ultimately, a well-executed CTI program should bolster your team’s ability to detect, contain, and mitigate attacks before they escalate into business-impacting incidents.